Unity Reflection 反射(翻译八)
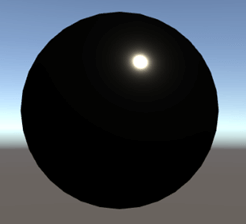
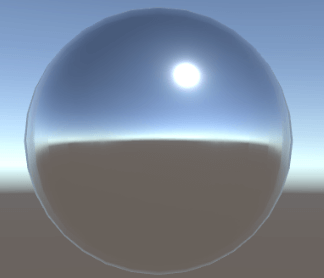
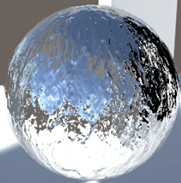
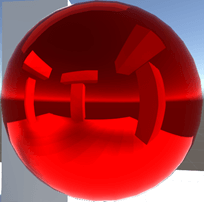
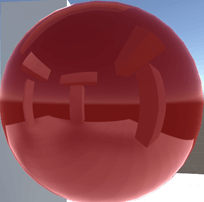
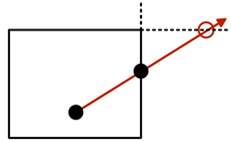
一块完美的镜子是不会发生漫反射,但现在我们自己的Shader包含的光照:环境光、漫反射、高光反射、纹理、阴影,结果看起来蛮好。但是当把Metallic设为1,Smoothness设位0.95,看起来很亮就很不自然了。从下图看尽管颜色是白色但整个表面都是黑色,只有一个很小的高亮点。这个亮点形成1是光源的入射,2朝向观察者的反射。
本篇摘要:
- 采样坏境
- 使用reflection probes探针
- 创建粗糙或光滑的镜面
- 完成box投影与立方体采样
- 混合两个探针
环境映射-Environment Mapping
一块完美的镜子是不会发生漫反射,但现在我们自己的Shader包含的光照:环境光、漫反射、高光反射、纹理、阴影,结果看起来蛮好。但是当把Metallic设为1,Smoothness设位0.95,看起来很亮就很不自然了。从下图看尽管颜色是白色但整个表面都是黑色,只有一个很小的高亮点。这个亮点形成1是光源的入射,2朝向观察者的反射。
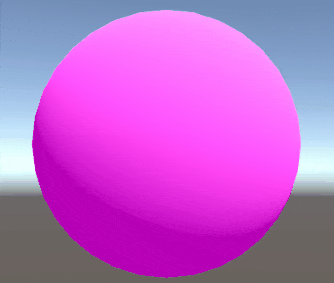
间接镜面反射
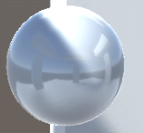
之前对于间接光光照计算时,只计算了漫反射没有计算镜面反射,默认值给的0。这就是为什么球面是黑色。现在我们简单的在_CreateIndirectLight_函数给specular变量赋值,看球的表面有什么变化:
1
indirectLight.specular = float3(1,0,1);

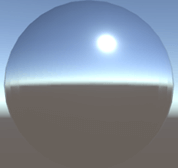
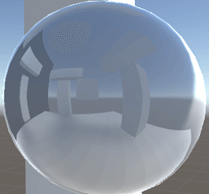
这就给出突破点,计算间接光specular的正确值,就可以反射周围环境!
关于边缘反射,最著名的就是菲涅耳反射。我们先使用UNITY_BRDF_PBS的版本来计算。
环境采样-Sampling Enviroment
为了反射周围环境,我们需要采样天空盒。场景内天空盒对应的内置变量是在_UnityShaderVariables_文件的_unity_SpecCube0_的,该变量类型取决于目标平台,又由_HLSLSupport_文件决定。而采样函数UNITY_SAMPLE_TEXCUBE宏需要两个参数,1是天空盒,2是uv。先用法线替代uv。同时天空盒支持HDR高动态范围颜色,所以还需要对HDR解码到RGB:UnityCG包含DecodeHDR函数
1
2
half4 envSample = UNITY_SAMPLE_TEXCUBE(unity_SpecCube0, i.normal);
indirectLight.specular = DecodeHDR(envSample, unity_SpecCube0_HDR);
UNITY_SAMPLE_TEXCUBE
函数是根据平台自动切换对应的CG函数,DecodeHDR转RGB:RGBM包含解码后的RGB和M系数。最终的RGB要与\(xM^y\)结果相乘。
1
2
3
4
5
6
7
8
9
10
11
12
13
14
15
16
17
18
19
20
21
// UNITY_SAMPLE_TEXCUBE内部实现
// Decodes HDR textures
// handles dLDR, RGBM formats
inline half3 DecodeHDR (half4 data, half4 decodeInstructions)
{
  // Take into account texture alpha
  // if decodeInstructions.w is true(the alpha value affects the RGB channels)
  half alpha = decodeInstructions.w * (data.a - 1.0) + 1.0;
   // If Linear mode is not supported we can skip exponent part
  #if defined(UNITY_COLORSPACE_GAMMA)
    return (decodeInstructions.x * alpha) * data.rgb;
  #else
      #if defined(UNITY_USE_NATIVE_HDR)
        // Multiplier for future HDRI relative to absolute conversion.
        return decodeInstructions.x * data.rgb;
      #else
        return (decodeInstructions.x *
               pow(alpha, decodeInstructions.y)) * data.rgb;
      #endif
  #endif
}
反射追踪-Tracing Reflections
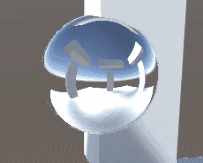
虽然得到正确的颜色,但没有看见正确的反射结果。因为上面使用了球体的法线采样环境,且投影不依赖视图方向,因此就好像在球体上画了环境。为了得到正确的结果,我们需要得到从相机到表面的方向,然后用表面法线再反射该方向。
1
2
3
4
5
6
7
8
9
UnityIndirect CreateIndirectLight(Interpolators i, float3 viewDir) {
    //。。。
    #if defined(FORWARD_BASE_PASS)
        float3 reflectDir = reflect(-viewDir, i.normal);
        half4 envSample = UNITY_SAMPLE_TEXCUBE(unity_SpecCube0, reflectDir);
        indirectLight.specular = DecodeHDR(envSample, unity_SpecCube0_HDR);
    #endif
    return indirectLight;
}
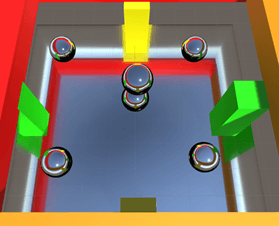
反射探针
Unity自带反射探针组件。通过chuangjia你_GameObject/Light/Reflection Probe。_参数如下图的的
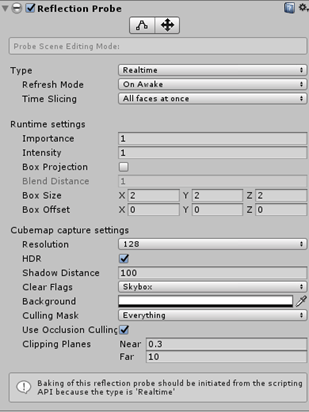
Type可以设置位bake或realtime,不管那种模式都会渲染6次。其中realtime模式下可以让程序通过代码配置:采样频率、在满足某种情况下激活采样,这能适当地节省运行时计算量。而烘焙模式下,需要把物体设置为静态模式。
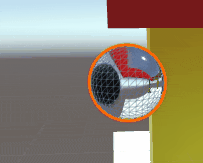
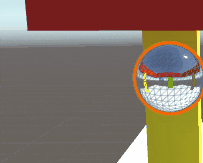
有瑕疵的反射
只有完美的光滑表面才能产生完美的反射,越粗糙的表面它的漫反射越多。如何模拟暗淡的模糊镜面反射?
开启MipMaps.
粗糙镜面
我们可使用UNITY_SAMPLE_TEXCUBE_LOD宏指定采样cubeMap的mipmap等级。由于烘焙得到的环境cubeMap使用三线性过滤,所以能混合相邻mipMapLevel.这可使得根据smoothness大小确定mipmap等级。材质越粗糙,mipMap等级就越高。粗糙值范围也是[0,1],也就是1-smoothess。Unity提供了UNITY_SPECCUBE_LOD_STEPS宏来计算这个范围。
1
2
3
4
5
/*2Lod采样*/
float3 reflectDir = reflect(-viewDir, i.normal);
float roughness = 1 - _Smoothness;
half4 envSample = UNITY_SAMPLE_TEXCUBE_LOD(unity_SpecCube0, reflectDir, roughness * UNITY_SPECCUBE_LOD_STEPS);
indirectLight.specular = DecodeHDR(envSample, unity_SpecCube0_HDR);
事实上,粗糙度和mipmap等级不是线性的,Unity使用了\(1.7r – 0.7r^2\)公式换算。r是原始的粗糙度
1
2
3
4
5
float3 reflectDir = reflect(-viewDir, i.normal);
float roughness = 1 - _Smoothness;
roughness *= 1.7 - 0.7 * roughness;
half4 envSample = UNITY_SAMPLE_TEXCUBE_LOD(unity_SpecCube0, reflectDir, roughness * UNITY_SPECCUBE_LOD_STEPS);
indirectLight.specular = DecodeHDR(envSample, unity_SpecCube0_HDR);

UnityStandardBRDF文件提供了Unity_GlossyEnvironment函数计算roughness、采样cubeMap、转换HDR代码,以及Unity_GlossyEnvironmentData结构体包含了roughness、反射方向。
1
2
3
4
5
6
7
8
9
10
11
12
/*3Unity宏*/
float3 reflectDir = reflect(-viewDir, i.normal);

Unity_GlossyEnvironmentData envData;
envData.roughness = 1 - _Smoothness;
envData.reflUVW = reflectDir;
indirectLight.specular = Unity_GlossyEnvironment
(
	UNITY_PASS_TEXCUBE (unity_SpecCube0),
	unity_SpecCube0_HDR,
	envData
);
这是Unity_GlossyEnvironment函数,内部计算细节与我们计算大致相同。
1
2
3
4
5
6
7
8
9
10
11
12
13
14
15
16
17
18
19
20
21
22
23
24
25
26
27
28
29
30
31
32
33
34
35
// -
half3 Unity_GlossyEnvironment (UNITY_ARGS_TEXCUBE(tex), half4 hdr, Unity_GlossyEnvironmentData glossIn)
{
    half perceptualRoughness = glossIn.roughness /* perceptualRoughness */ ;

    // TODO: CAUTION: remap from Morten may work only with offline convolution, see impact with runtime convolution!
    // For now disabled
#if 0
    float m = PerceptualRoughnessToRoughness(perceptualRoughness); // m is the real roughness parameter

    // smallest such that 1.0+FLT_EPSILON != 1.0  (+1e-4h is NOT good here. is visibly very wrong)
    const float fEps = 1.192092896e-07F;

    // remap to spec power. See eq. 21 in https://dl.dropboxusercontent.com/u/55891920/papers/mm_brdf.pdf
    float n =  (2.0/max(fEps, m*m))-2.0;
    n /= 4;

    // remap from n_dot_h formulatino to n_dot_r. See section "Pre-convolved Cube Maps vs Path Tracers"
    // in https://s3.amazonaws.com/docs.knaldtech.com/knald/1.0.0/lys_power_drops.html

    // remap back to square root of real roughness
    // (0.25 include both the sqrt root of the conversion and sqrt for going from roughness to perceptualRoughness)
    perceptualRoughness = pow( 2/(n+2), 0.25);
#else
    // MM: came up with a surprisingly close approximation to what the #if 0'ed out code above does.
    perceptualRoughness = perceptualRoughness*(1.7 - 0.7*perceptualRoughness);
#endif


    half mip = perceptualRoughnessToMipmapLevel(perceptualRoughness);
    half3 R = glossIn.reflUVW;
    half4 rgbm = UNITY_SAMPLE_TEXCUBE_LOD(tex, R, mip);

    return DecodeHDR(rgbm, hdr);
}
1
#define UNITY_PASS_TEXCUBE(tex) tex, sampler##tex
模拟凹凸镜
给材质球指定一个法线纹理。廉价的水面扰动模拟。
金属vs非金属
镜面和阴影
间接光反射依赖于物体表面的直接光照,最明显的就是阴影区域。对非金属而言,阴影区域反倒很亮。
对于金属而言,smoothness越光滑阴影越暗
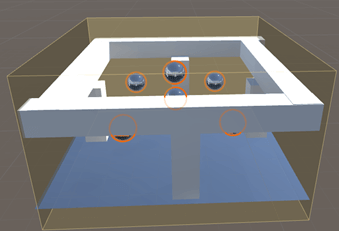
Box投影
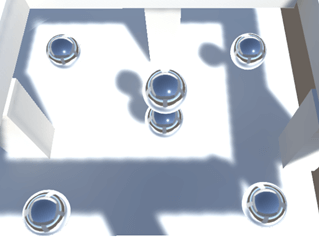
我们不想每个球体都配一个probe。但是只有一个Probe时为了能得到周围的反射,我们要计算probe反射方向与每个立方体的交点,然后构造中心probe到此交点的向量,得到最终的反射。
反射探针box
特性
- box尺寸和原点确定了其位置在世界空间的立方体区域
- 始终与轴对齐,忽略所有旋转和缩放
- Unity使用这些区域决定在渲染时使用哪个探针
- box指定了立方区域大小,以该大小进行投影
调整采样方向-BoxProjection
增加BoxProjection函数,目的是初始化反射方向。从cubeMap坐标和box边界采样得到。
第一步是偏移box到相对该表面顶点为中心
1
2
3
4
5
6
/*初始化box投影方向*/
float3 BoxProjection(float3 direction, float3 position, float3 cubeMapPosition, float3 boxMin, float3 boxMax) {
    boxMin -= position;
    boxMax -= position;
    return direction;
}
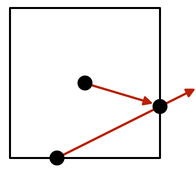
第二步缩放方向向量,以便从该位置移动到交点位置。
- x维度,如果方向向量x分量是正数,它就指向box的max边界;否则指向box的min边界。然后用正确边界值再除以方向向量的x分量,得到适当的标量。
- y、z维度同理。
- 取得三个标量,再从中拿到一个最小值。表示哪个边界面最接近表面。
1
2
3
4
5
6
7
8
9
10
float3 BoxProjection(float3 direction, float3 position, float3 cubeMapPosition, float3 boxMin, float3 boxMax) {
    boxMin -= position;
    boxMax -= position;

    float x = (direction.x > 0 ? boxMax.x : boxMin.x) / direction.x;
    float y = (direction.y > 0 ? boxMax.y : boxMin.y) / direction.y;
    float z = (direction.z > 0 ? boxMax.z : boxMin.z) / direction.z;
    float scalar = min(min(x, y), z);
    return direction;
}
第三步使用最小标量缩放方向向量找到交点。通过减去cubeMap位置得到新的反射方向。
1
return direction * scalar + (position - cubeMapPosition);
可以使用任何非零向量对cubemap进行采样。cubemap采样基本上和我们刚才做的是一样的。它指出向量指向哪个面,然后执行除法以找到与cubemap面相交的点。它使用这个点的适当坐标来采样纹理。
简化上面三步的代码如下:
1
2
3
4
5
6
7
8
9
10
11
float3 BoxProjection(float3 direction, float3 position, float3 cubeMapPosition, float3 boxMin, float3 boxMax) {
    boxMin -= position;
    boxMax -= position;
    /*	float x = (direction.x > 0 ? boxMax.x : boxMin.x) / direction.x;
    float y = (direction.y > 0 ? boxMax.y : boxMin.y) / direction.y;
    float z = (direction.z > 0 ? boxMax.z : boxMin.z) / direction.z;
    float scalar = min(min(x, y), z);*/
    float3 scalarVec = (direction > 0 ? boxMax : boxMin) / direction;
    float scalar = min(min(scalarVec.x, scalarVec.y), scalarVec.z);
    return direction * scalar + (position - cubeMapPosition);
}
这样的盒型投影探针能够很好的解决多个probe带来的性能问题。
可选的投影
组件有个Project toggle开关,用以控制是否使用盒型投影探针。Unity把这个开关值存在cubeMap坐标的第四个分量,如果w值大于0表示开启盒型投影探针。
1
2
3
4
5
6
7
8
9
10
11
12
13
14
15
16
17
18
/*初始化box投影方向*/
float3 BoxProjection(float3 direction, float3 position,
    float4 cubeMapPosition, float3 boxMin, float3 boxMax) {
    boxMin -= position;
    boxMax -= position;
    /*float x = (direction.x > 0 ? boxMax.x : boxMin.x) / direction.x;
    float y = (direction.y > 0 ? boxMax.y : boxMin.y) / direction.y;
    float z = (direction.z > 0 ? boxMax.z : boxMin.z) / direction.z;
    float scalar = min(min(x, y), z);*/

    if (cubeMapPosition.w > 0)
    {
        float3 scalarVec = (direction > 0 ? boxMax : boxMin) / direction;
        float scalar = min(min(scalarVec.x, scalarVec.y), scalarVec.z);
        direction = direction * scalar + (position - cubeMapPosition);
    }
    return direction;
}
Unity有一个UNITY_BRANCH宏来要求编译器提供和和实际编写时一样的分支而不是条件赋值语句。不太赞同在shader使用大量分支语句
1
2
3
4
UNITY_BRANCH
if (cubemapPosition.w > 0) {
    //...
}
Unity也提供了计算采样boxProjection反射方向的函数:BoxProjectedCubemapDirection定义在_UnityStandardUtils文件中。不使用的原因是对方向做了归一化,前面讲了任何非零向量都可采样。
1
2
3
4
5
6
7
8
9
10
11
12
13
14
15
16
17
18
19
20
21
22
23
24
25
26
27
28
29
//-
inline half3 BoxProjectedCubemapDirection (half3 worldRefl, float3 worldPos, float4 cubemapCenter, float4 boxMin, float4 boxMax)
{
    // Do we have a valid reflection probe?
    UNITY_BRANCH
    if (cubemapCenter.w > 0.0)
    {
        half3 nrdir = normalize(worldRefl);

        #if 1
            half3 rbmax = (boxMax.xyz - worldPos) / nrdir;
            half3 rbmin = (boxMin.xyz - worldPos) / nrdir;
            half3 rbminmax = (nrdir > 0.0f) ? rbmax : rbmin;

        #else // Optimized version
            half3 rbmax = (boxMax.xyz - worldPos);
            half3 rbmin = (boxMin.xyz - worldPos);
            half3 select = step (half3(0,0,0), nrdir);
            half3 rbminmax = lerp (rbmax, rbmin, select);
            rbminmax /= nrdir;
        #endif

        half fa = min(min(rbminmax.x, rbminmax.y), rbminmax.z);

        worldPos -= cubemapCenter.xyz;
        worldRefl = worldPos + nrdir * fa;
    }
    return worldRefl;
}
混合反射探针
在探针组件定义的立方体区域边界切换时,如何做到自然过渡?
两个探针插值计算
shader支持了两个探针数据,第二个探针内置变量名是unity_SpecCube1。我们要采样两次环境贴图并依据哪个更优进行插值。Unity已经做了计算把插值值存在了,unity_SpecCube0_BoxMin的第四个分量w。w为1只是第一个探针,值小于1开始混合。
1
2
3
4
5
6
7
8
9
10
11
12
13
14
15
16
17
18
19
20
float3 reflectDir = reflect(-viewDir, i.normal);
Unity_GlossyEnvironmentData envData;
envData.roughness = 1 - _Smoothness;

envData.reflUVW = BoxProjection(reflectDir, i.worldPos, unity_SpecCube0_ProbePosition unity_SpecCube0_BoxMin, unity_SpecCube0_BoxMax);//reflectDir;
float3 probe0 = Unity_GlossyEnvironment(
    UNITY_PASS_TEXCUBE(unity_SpecCube0),
    unity_SpecCube0_HDR,
    envData
);

envData.reflUVW = BoxProjection(reflectDir, i.worldPos, unity_SpecCube1_ProbePosition, unity_SpecCube1_BoxMin, unity_SpecCube1_BoxMax);
float3 probe1 = Unity_GlossyEnvironment(
    //UNITY_PASS_TEXCUBE(unity_SpecCube1),//注意:这里由于需要两个探针过渡,但是场景内只有一个探针。所以用下面代码消除错误。
    UNITY_PASS_TEXCUBE_SAMPLER(unity_SpecCube1,unity_SpecCube0),
    unity_SpecCube1_HDR,
    envData
);

indirectLight.specular = lerp(probe1 ,probe0, unity_SpecCube0_BoxMin.w);
探针盒重叠
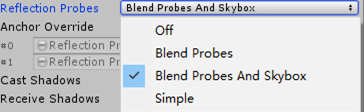
多个探针重叠有一个权重值

也可以混合探针和天空盒,其中off是关闭探针只用天空盒
优化
由于计算两个探针的计算量太大,增加一个分支
1
2
3
4
5
6
7
8
9
10
11
12
13
14
15
16
17
18
#if UNITY_SPECCUBE_BLENDING
    UNITY_BRANCH
    if (unity_SpecCube0_BoxMin.w < 0.9999) {
        envData.reflUVW = BoxProjection(reflectDir, i.worldPos, unity_SpecCube1_ProbePosition, unity_SpecCube1_BoxMin, unity_SpecCube1_BoxMax);
        float3 probe1 = Unity_GlossyEnvironment(
        //UNITY_PASS_TEXCUBE(unity_SpecCube1),
        UNITY_PASS_TEXCUBE_SAMPLER(unity_SpecCube1, unity_SpecCube0),
        unity_SpecCube1_HDR,
        envData
    );
        indirectLight.specular = lerp(probe1, probe0, unity_SpecCube0_BoxMin.w);
    }
    else {
        indirectLight.specular = probe0;
    }
#else
        indirectLight.specular = probe0;
#endif
对于BoxProjection函数的优化指令:UNITY_SPECCUBE_BOX_PROJECTION
1
2
3
4
5
6
7
8
#if UNITY_SPECCUBE_BOX_PROJECTION
    UNITY_BRANCH
    if (cubeMapPosition.w > 0) {
        float3 scalarVec = (direction > 0 ? boxMax : boxMin) / direction;
        float scalar = min(min(scalarVec.x, scalarVec.y), scalarVec.z);
        direction = direction * scalar + (position - cubeMapPosition);
    }
#endif
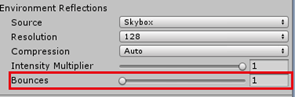
模拟反射的反弹
这有个光的反弹系数,最高5次。计算量很大。$ $