Unity Shader GUI 扩展一(翻译九)
选中当前材质后,若材质使用的Shader调用了GUI拓展,则会自动读取该Shader的所有属性。通过重实现OnGUI函数后,获取其参数地址就能读取。
本篇摘要:
- 自定义Shader GUI面板拓展
- 混合金属与非金属效果
- 非均匀平滑
- 表面自发光
自定义界面
自定义Shader界面功能,与自定义GUI面板类似,区别在于重实现函数不同。

ShaderGUI 拓展
创建一脚本继承UnityEditor.ShaderGUI,脚本放入Editor文件夹下
1
2
3
4
5
6
7
8
using UnityEngine;

namespace  GUIExtension
{
    public class MyCustomShaderGUI : UnityEditor.ShaderGUI
    {
    }
}
同时在需要修改面板界面的Shader文件内,引用该类文件。注意命名空间也要带上
1
2
3
4
5
6
7
8
Shader "Custom/Custom/Shader_GUIExtension"
{
    SubShader{}
    SubShader{}
    SubShader{}
    //只能放在所有SubShader最后调用
    CustomEditor "GUIExtension.MyCustomShaderGUI"
}
同时再次查看ShaderGUI有哪些虚函数可供重写。
1
2
3
4
5
6
7
8
9
10
11
12
13
14
15
16
17
18
19
20
21
22
23
24
25
26
27
28
29
30
31
32
33
34
35
36
37
using UnityEngine;
namespace UnityEditor
{
    public abstract class ShaderGUI
    {
        protected ShaderGUI();

        // 参数:
        //   propertyName:Name of the material property.
        //   properties: OnGUI函数引用地址传递.
        // 返回结果: 没找到返回null.
        protected static MaterialProperty FindProperty(string propertyName, MaterialProperty[] properties);

        // 参数:
        //   propertyName:Name of the material property.
        //   properties:The array of available properties.
        //   propertyIsMandatory:值true且没有找到对应property就抛出异常
        // 返回结果:同上
        protected static MaterialProperty FindProperty(string propertyName, MaterialProperty[] properties, bool propertyIsMandatory);

        // 摘要:给这个材质选一个新shader时的回调
        public virtual void AssignNewShaderToMaterial(Material material, Shader oldShader, Shader newShader);

        // 参数:
        //   materialEditor:当前材质面板
        //   properties:当前选中的shader所有properties.
        public virtual void OnGUI(MaterialEditor materialEditor, MaterialProperty[] properties);

        public virtual void OnMaterialInteractivePreviewGUI(MaterialEditor materialEditor, Rect r, GUIStyle background);

        //预览
        public virtual void OnMaterialPreviewGUI(MaterialEditor materialEditor, Rect r, GUIStyle background);

        //预览
        public virtual void OnMaterialPreviewSettingsGUI(MaterialEditor materialEditor);
    }
}
第一个重实现函数就是:OnGUI
创建文本
创建文本与GUI拓展创建文本类似,统一使用GUILayout
1
2
3
4
5
6
7
8
public override void OnGUI(MaterialEditor materialEditor, MaterialProperty[] properties)
{
DoMain();
}
void DoMain()
{
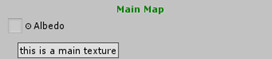
GUILayout.Label("Main Map");
}

GUILayout.Label有多个重载函数,可以为文字指定各种颜色、字体、格式等效果。

显示Albedo纹理属性
选中当前材质后,若材质使用的Shader调用了GUI拓展,则会自动读取该Shader的所有属性。通过重实现OnGUI函数后,获取其参数地址就能读取。
1
2
3
4
5
6
7
8
9
MaterialEditor MaterialEditor;
MaterialProperty[] materialProperties;
//MaterialEditor是面板实例
//该shader所有properties
public override void OnGUI(MaterialEditor materialEditor, MaterialProperty[] properties)
{
    this.MaterialEditor = materialEditor;
    this.materialProperties = properties;
}
查找Albedo属性,并将其显示出来。Albedo是一个Texture纹理属性,对应一张纹理和名称描述,可使用FindProperty和GUIContent容器
1
2
3
4
5
6
7
void AlbedoPropertyShow()
{
    MaterialProperty albedo = FindProperty("_MainTex", materialProperties, true);
    //displayName是shader内手写好的名字
    GUIContent content = new GUIContent(albedo.displayName, albedo.textureValue, "this is a main texture");
    MaterialEditor.TexturePropertySingleLine(content, albedo);
}
然后给该纹理增加色调Tint显示
1
2
3
4
5
6
7
8
9
void AlbedoPropertyShow()
{
    MaterialProperty albedo = FindProperty("_MainTex", MaterialProperties, true);
    MaterialProperty tint = FindProperty("_Tint", MaterialProperties, true);
    //displayName是shader内手写好的名字
    GUIContent content = new GUIContent(albedo.displayName, albedo.textureValue, "this is a main texture");
    //重载函数
    MaterialEditor.TexturePropertySingleLine(content, albedo, tint);
}

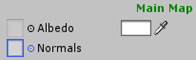
显示Normal纹理属性
同理,有一个点在于bumpScale属性显示,假如没有指定纹理时就不想显示BumbScale属性。
1
2
3
4
5
6
7
8
9
10
void NormalShow()
{
    MaterialProperty normal = FindProperty("_NormalMap", MaterialProperties, true);

    //没有纹理时不想显示bumpscale
    MaterialProperty bumpScale = null;
    if(normal.textureValue != null) bumpScale = FindProperty("_BumpScale", MaterialProperties, true);

    MaterialEditor.TexturePropertySingleLine(MakeGUIContent(normal), normal, bumpScale);
}

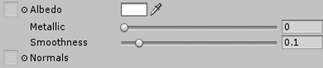
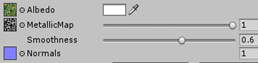
显示金属和平滑值属性
这两个值主要作用于MainTex纹理,应该放在其之后位置显示。
1
2
3
4
5
6
7
8
9
10
11
12
13
void SpecialShaderPropertyShow(string propertyName,string tooltip = null)
{
    MaterialProperty metallic = FindProperty(propertyName, MaterialProperties, true);
    MaterialEditor.ShaderProperty(metallic, MakeLabelGUIContent(metallic, tooltip));
}
void MetallicShow()
{
    SpecialShaderPropertyShow("_Metallic");
}
void SmoothnessShow()
{
    SpecialShaderPropertyShow("_Smoothness");
}

1
2
3
4
//必须包围使用, 先缩进后恢复,不然会影响后面的显示
EditorGUI.indentLevel += 2;
MaterialEditor.ShaderProperty(metallic, MakeLabelGUIContent(metallic, tooltip));
EditorGUI.indentLevel -= 2;
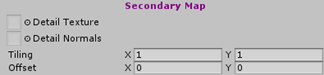
显示第二细节纹理
同理,不贴代码了。
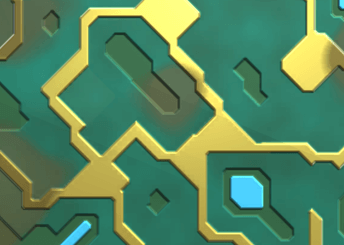
金属纹理
如何混合金属与非金属纹理,两个不同光泽的纹理如何混合?

使用Metallic 纹理
一般可以用灰度图标记金属色、凹凸(视差)色。金属标记为1白色,非金属向0趋近黑色。因此采样灰度图、高度图alpha与diffuse混合。接着扩展GUI-略
1
2
3
4
5
6
//...
[NoScaleOffset]_MetallicMap("MetallicMap", 2D) = "white"{}
float GetMetallic(Interpolators i)
{
    return tex2D(_MetallicMap, i.uv.xy).r * _Metallic;
}
定义Metallic的Shader关键字
当使用metallicMap时就不能再使用metallicValue滑条,如不就会导致双倍叠加。所以可以用Shader关键字来决定使用二者之一。MaterialEditor.target是当前inspector面板material实例,增加关键字可以使用Material.EnableKeyword,禁用Material.DisableKeyword。
1
2
3
4
5
6
7
8
9
10
11
void SetKeyword(string keyword, bool enable)
{
    if(enable)
    {
        targetMaterial.EnableKeyword(keyword);
    }
    else
    {
        targetMaterial.DisableKeyword(keyword);
    }
}
自定义命名约定:_XXX_XX_...。而#pragma multi_compile指令会自动纳入已定义的关键字生成shader变体。
2.5 打开Debug模式查看

使用自定义Keyword(Features)
1
#pragma multi_compile _ _MATALLIC_MAP
使用multi_compile指令然后分别查看变体编译:
有没有使用Matallic贴图都会编译出如下排列组合
1
2
3
4
5
6
7
8
9
10
8 keyword variants used in scene:

<no keywords defined>
_MATALLIC_MAP
VERTEXLIGHT_ON
VERTEXLIGHT_ON _MATALLIC_MAP
SHADOWS_SCREEN
SHADOWS_SCREEN _MATALLIC_MAP
SHADOWS_SCREEN VERTEXLIGHT_ON
SHADOWS_SCREEN VERTEXLIGHT_ON _MATALLIC_MAP
可是,multi_compile指令会生成所有可能的排列组合变体,这些要花费大量时间编译,而且有些keywords确实没使用。对于自定义的shader keywords可以使用shader_feature编译指令优化哪些没有使用的关键字,不生成变体,同时在构建时也会检查关键字是否被使用。
shader_feature没有使用Matallic贴图,变体数量降低:
1
2
3
4
5
6
4 keyword variants used in scene:

<no keywords defined>
VERTEXLIGHT_ON
SHADOWS_SCREEN
SHADOWS_SCREEN VERTEXLIGHT_ON
那么multi_compile与shader_feature何时使用? 1、对于shader_feature最佳食用方法就是在编辑器模式,人工配置material面板属性自动收集变体。 2、如果要在runtime使用shader_feature,就要确保所有的shader变体都被构建进应用内。当然这也是很完美的方案,但是一定要确保能够手动收集所有变体 3、对于第二点的稍次解决方案就是使用muti_compile指令
根据关键字启用,自动获取
1
2
3
4
5
6
7
float GetMetallic(Interpolators i) {
#if defined(_METALLIC_MAP)
    return tex2D(_MetallicMap, i.uv.xy).r;
#else
    return _Metallic;
#endif
}
ChangeCheck检查
现在每帧调用OnGUI,会重复执行所有方法。理论上只有当material面板属性被改变了,调用执行内部方法。Unity提供了EditorGUI.BeginChaneCheck和EditorGUI.EndChangeCheck方法。这两个方法需要匹配使用,begin在要检查之前的位置调用,end在结束时检查:若有修改返回true
1
2
3
4
5
6
7
8
9
void MetallicMapShow()
{
    EditorGUI.BeginChangeCheck();
    MaterialProperty mp = MakerMapWithScaleShow("_MetallicMap", "_Metallic", true);
    if(EditorGUI.EndChangeCheck())
    {
        SetKeyword("_METALLIC_MAP", mp.textureValue);
    }
}
光滑纹理
类似金属纹理,光滑纹理也是一张灰度图。金属部分很光滑,其他部分很粗糙。Unity提供的standardShader是采样了纹理的alpha通道,而事实上它要求金属和光滑值合并在同一张金属贴图的不同通道(这也给了一个很好的工作流提示)。好处:一是不用采样两次;二是DXT5压缩会分离RGB和A通道。当然这在两者都需要之下。
1
2
3
4
5
6
7
float GetSmoothness(Interpolators i) {
#if defined(_METALLIC_MAP)
    return tex2D(_MetallicMap, i.uv.xy).a  * _Smoothness;
#else
    return _Smoothness;
#endif
}
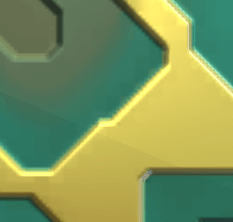
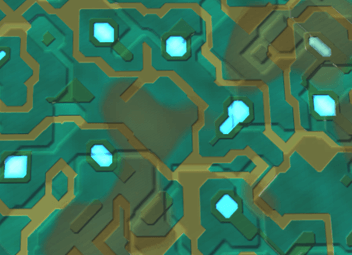
效果缺点:DXT5nm纹理压缩法线贴图会造成伪影。尖锐的对角边没有与UV轴对齐,不能正确地近似。电路中是这种压缩最糟糕的情况。这种缺点在金属和非常光滑的表面上变得清晰可见。
Albedo与smoothness结合
第一个工作流:对于金属质感材质总是需要Metallic,同时也肯定需要smoothness增强平滑感。
第二个工作流:不要金属质感而要平滑,可以把smoothness放进Albedo纹理alpha通道。这种情况适用不需要金属的不透明材质。
关键字选择
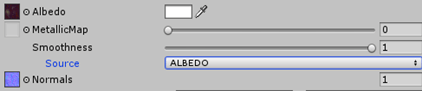
对于多个工作流,能提供一个下拉列表项匹配就很方便。
1
2
3
4
enum SmoothnessSource
{
    Uniform, Albedo, Metallic
}
当使用Uniform代表没有关键字写入。当Albedo代表包含光滑度的albedo纹理;当metallic代表包含光滑度的metallic纹理。Material实例提供了IsKeywordEnabled函数检测关键字启用。
1
2
3
4
5
6
7
8
9
10
11
12
13
14
15
16
17
18
19
20
21
22
23
24
25
26
27
28
29
30
31
32
33
void SmoothnessShow()
{
    Switchkeyword source = Switchkeyword.UNIFORM;

    if (IsKeyEnable(keyword_smoothness_albedo))
    {
        source = Switchkeyword.SMOOTHNESS;
    }

    if(IsKeyEnable(keyword_smoothness_metallic))
    {
        source = Switchkeyword.METALLIC;
    }
    //必须包围使用, 先缩进后恢复,不会影响后面的显示
    EditorGUI.indentLevel += 2;
    MakeShaderSpecialPropertyShow("_Smoothness");

    EditorGUI.indentLevel += 1;
    GUIContent gc = new GUIContent("Source");
    EditorGUI.BeginChangeCheck();
    EditorGUI.indentLevel += 1;
    GUIContent gc = new GUIContent("Source");
    //在这里开始检查是否手动修改了下拉单元,然后设置对应的关键字
    EditorGUI.BeginChangeCheck();
    source = (Switchkeyword)EditorGUILayout.EnumPopup(gc, source);
    if (EditorGUI.EndChangeCheck())
    {
        //RecordAction("123124");//取消
        SetKeyword(keyword_smoothness_metallic, source == Switchkeyword.METALLIC);
        SetKeyword(keyword_smoothness_albedo, source == Switchkeyword.SMOOTHNESS);
    }
    EditorGUI.indentLevel -= 3;
}
Unity提供了MaterialEditor.RegisterPropertyChangeUndo函数取消
Smoothness变体使用
#pragma shader_feature _ _SMOOTHNESS_ALBEDO _SMOOTHNESS_METALLIC
先检查是否使用albedo关键字作为平滑,然后检查smoothness和metallic作为平滑(当开启金属肯定会有平滑需求)。然后与_Smoothness叠加。叠加:1不变,拉动滑条能二次调节。叠加这是一种效果算法,是经验公式,写的多、积累的多了,自然就能写出自己的经验公式。
float GetSmoothness(Interpolators i)
{
    float smoothness = 1;
#if defined(_SMOOTHNESS_ALBEDO)
    smoothness = tex2D(_MainTex, i.uv.xy).a;
#elif defined(_SMOOTHNESS_METALLIC) && defined(_METALLIC_MAP)
    smoothness = tex2D(_MetallicMap, i.uv.xy).a ;
#endif
    return smoothness * _Smoothness;
}
查看Smoothness_Albedo
自发光
通过模拟材质表面光源效果,只需要在basePase采样一次即可。
1
2
3
4
5
[NoScaleOffset]_EmissionMap("EmissionMap", 2D) = "white"{}
_Emission("Emission", Color) = (0,0,0)//默认黑色,叠加

//base pass
#pragma shader_feature _ _EMISSION_MAP
1
2
3
4
5
6
7
8
9
10
11
//自发光采样
float3 GetEmission(Interpolators i){
#ifdef FORWARD_BASE_PASS
    #ifdef _EMISSION_MAP
        return tex2D(_EmissionMap, i.uv.zw).rgb;
    #else
        return _Emission;
    #endif
#endif
    return 0;
}
1
2
//片元函数
final.rgb += GetEmission(i);
HDR Emission
HDR:颜色的RGB分量可以大于1,创建bloom效果。
Unity中_MaterialEditor_正好提供了_TexturePropertyWithHDRColor_函数,需要参数一是颜色范围;参数二是否需要alpha通道。
颜色范围有ColorPickerHDRConfig对象声明,亮度范围和曝光范围。先取StandardShader数值(0,99, 1/99, 3)
1
2
3
4
5
6
7
8
Rect r = MaterialEditor.TexturePropertyWithHDRColor
(
    MakeMapGUIContent(mapinfo, null),
    mapinfo,
    bumpScale,
    config,
    false
);
$ $