自定义渲染管线:点光源与聚光灯 (翻译九)
扩展渲染管线以支持点光源和聚光灯,包含实时渲染和烘焙光照,同时实现每物体最多8个光源的限制。
- 支持更多光源类型,而不仅限于方向光。
- 包含实时点光源和聚光灯。
- 为点光源和聚光灯烘焙光照和阴影。
- 限制每个对象最多渲染8个其他光源。
背景:为什么需要更多光源类型?
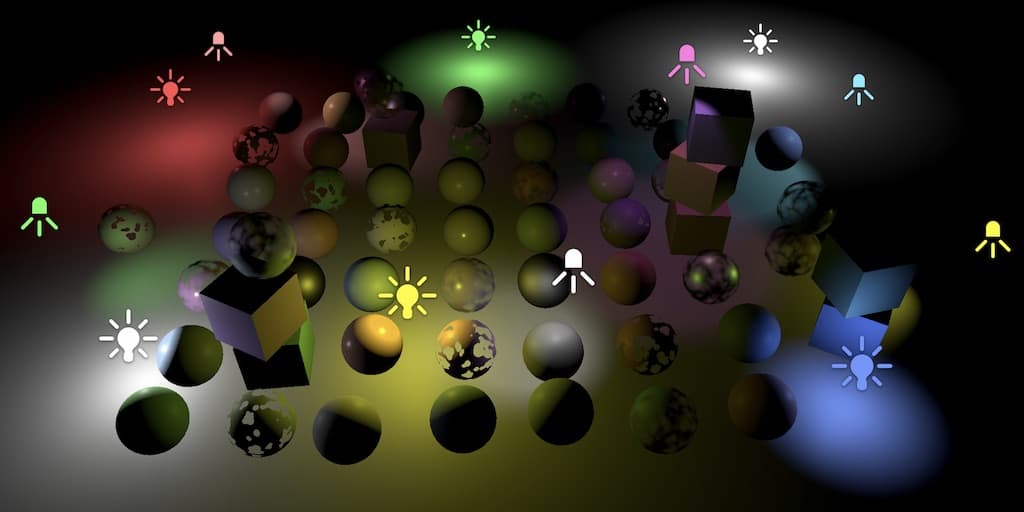
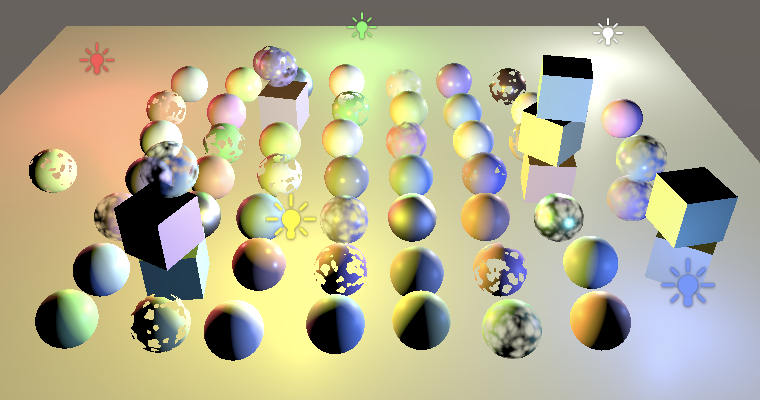
在此之前,我们只实现了方向光。方向光是一种理想化的无限远光源,它从同一方向照射到所有表面,不考虑距离。然而,真实游戏场景中的光照远比这复杂:玩家需要点燃的灯笼、汽车的前灯、舞台上的聚光灯等。这些光源都有具体的位置,光照强度随距离变化。
点光源基础
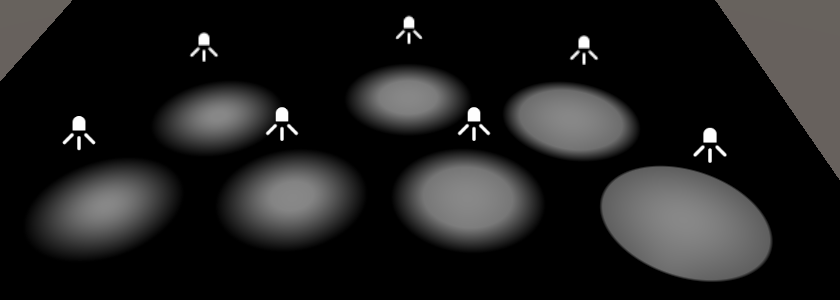
点光源位于空间中的一个点,并向各个方向均匀地发射光线。光线照射到物体表面时,其方向是从接触点指向光源中心的连线。光强随距离的增加而减弱,并在特定距离处降至零。光强与光源距离的平方成反比。这被称为“平方反比定律”,与光在现实世界中的行为类似。
点光源可用于模拟场景中的灯具和其他局部光源。可以用它们来制造火花或爆炸,并以逼真的方式照亮周围环境。
光源数量限制
与方向光类似,我们也只能支持有限数量的其他类型光源。场景中通常包含大量非方向光,因为它们的影响范围是有限的。对于任何给定帧,只有部分光源是可见的。因此,最大数量限制是针对单帧而言,而非整个场景。
如果可见光源数量超过限制,一些光源将被忽略。Unity 会根据重要性对可见光源列表进行排序,因此只要可见光源不变化,被忽略的光源也是一致的。但如果相机移动或场景变化,可能导致明显的光源突现(light popping)。
我们在 Lighting 类中定义最多支持 64 个其他光源:
1
const int maxDirLightCount = 4, maxOtherLightCount = 64;
传递光源数据到 GPU
与方向光一样,我们需要将光源数量和颜色发送到 GPU。对于其他光源类型,还需要发送位置信息。
首先在 Lighting 中添加着色器属性 ID 和数组字段:
1
2
3
4
5
6
7
8
static int
otherLightCountId = Shader.PropertyToID("_OtherLightCount"),
otherLightColorsId = Shader.PropertyToID("_OtherLightColors"),
otherLightPositionsId = Shader.PropertyToID("_OtherLightPositions");

static Vector4[]
otherLightColors = new Vector4[maxOtherLightCount],
otherLightPositions = new Vector4[maxOtherLightCount];
然后在 SetupLights 方法中处理其他光源的计数和数据传递:
1
2
3
4
5
6
7
8
9
10
11
12
13
14
15
void SetupLights () {
    NativeArray<VisibleLight> visibleLights = cullingResults.visibleLights;
    int dirLightCount = 0, otherLightCount = 0;
    for (int i = 0; i < visibleLights.Length; i++) {
        // ... 处理光源
    }

    buffer.SetGlobalInt(otherLightCountId, otherLightCount);
    if (otherLightCount > 0) {
        buffer.SetGlobalVectorArray(otherLightColorsId, otherLightColors);
        buffer.SetGlobalVectorArray(
            otherLightPositionsId, otherLightPositions
        );
    }
}
着色器端的数据定义
在 Light 着色器文件中定义其他光源的最大数量和缓冲区:
1
2
3
4
5
6
7
8
9
10
11
12
13
#define MAX_DIRECTIONAL_LIGHT_COUNT 4
#define MAX_OTHER_LIGHT_COUNT 64

CBUFFER_START(_CustomLight)
    int _DirectionalLightCount;
    float4 _DirectionalLightColors[MAX_DIRECTIONAL_LIGHT_COUNT];
    float4 _DirectionalLightDirections[MAX_DIRECTIONAL_LIGHT_COUNT];
    float4 _DirectionalLightShadowData[MAX_DIRECTIONAL_LIGHT_COUNT];

    int _OtherLightCount;
    float4 _OtherLightColors[MAX_OTHER_LIGHT_COUNT];
    float4 _OtherLightPositions[MAX_OTHER_LIGHT_COUNT];
CBUFFER_END
添加一个函数来获取其他光源的数量:
1
2
3
int GetOtherLightCount () {
    return _OtherLightCount;
}
点光源设置方法
创建 SetupPointLight 方法来设置点光源的颜色和位置:
1
2
3
4
void SetupPointLight (int index, ref VisibleLight visibleLight) {
    otherLightColors[index] = visibleLight.finalColor;
    otherLightPositions[index] = visibleLight.localToWorldMatrix.GetColumn(3);
}
修改光源循环
修改 SetupLights 中的循环,使用 switch 语句区分不同类型的光源:
1
2
3
4
5
6
7
8
9
10
11
12
13
14
15
16
for (int i = 0; i < visibleLights.Length; i++) {
    VisibleLight visibleLight = visibleLights[i];

    switch (visibleLight.lightType) {
        case LightType.Directional:
            if (dirLightCount < maxDirLightCount) {
                SetupDirectionalLight(dirLightCount++, ref visibleLight);
            }
            break;
        case LightType.Point:
            if (otherLightCount < maxOtherLightCount) {
                SetupPointLight(otherLightCount++, ref visibleLight);
            }
            break;
    }
}
光照计算
在着色器中添加 GetOtherLight 函数来计算点光源的光照:
1
2
3
4
5
6
7
8
Light GetOtherLight (int index, Surface surfaceWS, ShadowData shadowData) {
    Light light;
    light.color = _OtherLightColors[index].rgb;
    float3 ray = _OtherLightPositions[index].xyz - surfaceWS.position;
    light.direction = normalize(ray);
    light.attenuation = 1.0;
    return light;
}
在 GetLighting 函数中添加循环来处理其他光源:
1
2
3
4
5
6
7
8
9
10
11
12
13
14
15
16
17
18
float3 GetLighting (Surface surfaceWS, BRDF brdf, GI gi) {
    ShadowData shadowData = GetShadowData(surfaceWS);
    shadowData.shadowMask = gi.shadowMask;

    float3 color = IndirectBRDF(surfaceWS, brdf, gi.diffuse, gi.specular);

    for (int i = 0; i < GetDirectionalLightCount(); i++) {
        Light light = GetDirectionalLight(i, surfaceWS, shadowData);
        color += GetLighting(surfaceWS, brdf, light);
    }

    for (int j = 0; j < GetOtherLightCount(); j++) {
        Light light = GetOtherLight(j, surfaceWS, shadowData);
        color += GetLighting(surfaceWS, brdf, light);
    }

    return color;
}
距离衰减
逆平方定律
目前的点光源虽然可以工作,但亮度衰减不正确。光从光源发出后会散开,距离越远,光线越分散,亮度也随之降低。光照强度遵循逆平方定律:
\[I = \frac{i}{d^2}\]其中 $i$ 是配置的强度,$d$ 是距离。这意味着在距离小于 1 的地方,强度会大于配置值——光源附近会非常亮。
在 GetOtherLight 中应用距离衰减:
1
2
float distanceSqr = max(dot(ray, ray), 0.00001);
light.attenuation = 1.0 / distanceSqr;
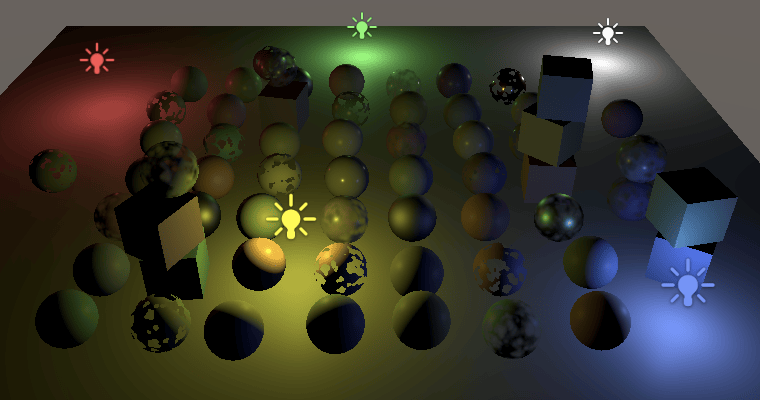

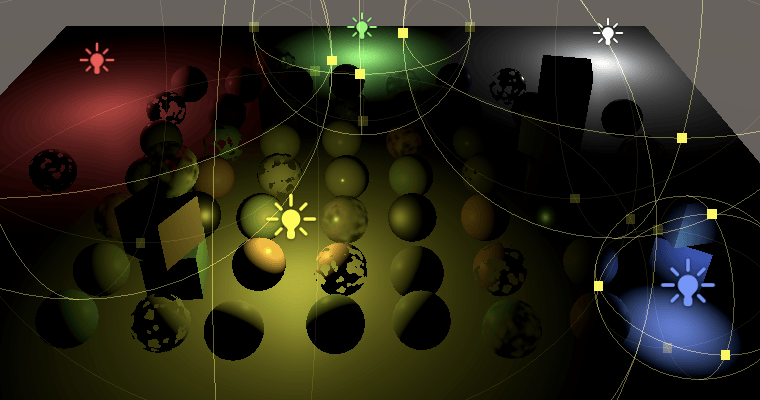
光源范围
虽然点光源强度随距离快速衰减,但理论上它们仍然会影响所有物体,即使距离很远。为了实际渲染,我们使用最大光源范围,超过该范围后强制将光照强度设为 0。
这样点光源被限制在一个由位置和范围定义的边界球体内。
我们不会在范围边界突然切断光照,而是使用范围衰减来平滑淡出。Unity 的通用渲染管线(URP)和光照贴图使用以下公式:
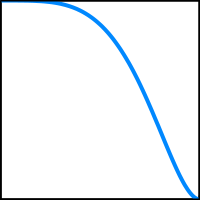
\[f(x) = \max\left(0, 1 - \left(\frac{d^2}{r^2}\right)^2\right)\]其中 $d$ 是距离,$r$ 是光源范围。
存储范围数据
将范围存储在位置向量的第四个分量中。存储 $1/r^2$ 而不是 $r$,以减少着色器中的计算:
1
2
3
4
5
6
void SetupPointLight (int index, ref VisibleLight visibleLight) {
    otherLightColors[index] = visibleLight.finalColor;
    Vector4 position = visibleLight.localToWorldMatrix.GetColumn(3);
    position.w = 1f / Mathf.Max(visibleLight.range * visibleLight.range, 0.00001f);
    otherLightPositions[index] = position;
}
在着色器中应用范围衰减:
1
2
3
4
5
float distanceSqr = max(dot(ray, ray), 0.00001);
float rangeAttenuation = Square(
    saturate(1.0 - Square(distanceSqr * _OtherLightPositions[index].w))
);
light.attenuation = rangeAttenuation / distanceSqr;
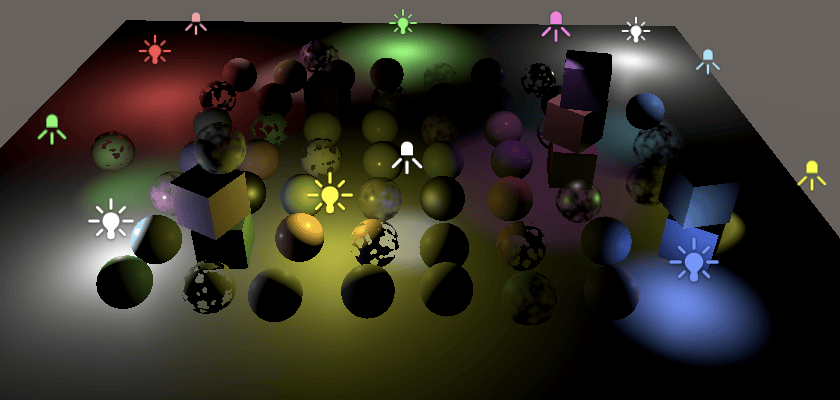
聚光灯
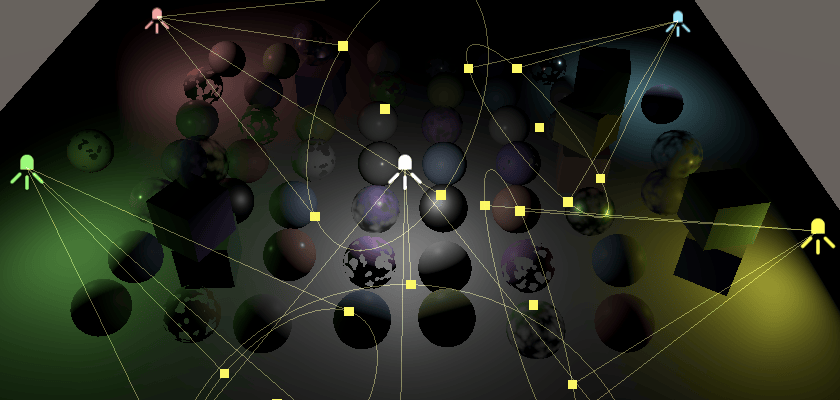
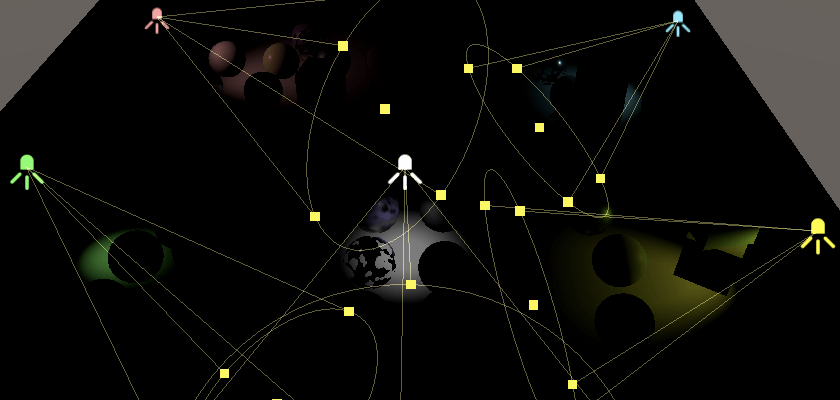
与点光源类似,聚光灯也具有特定的位置和范围,光线会在该范围内衰减。然而,聚光灯的照射角度受到限制,从而形成一个锥形照明区域。锥体的中心指向光源的前方(Z轴)方向。聚光灯锥体边缘的光线也会减弱。增大照射角度会增加锥体的宽度,同时也会增加这种衰减区域(称为“半影”)的大小。

聚光灯概述
聚光灯通常用于人造光源,例如手电筒、汽车前灯和探照灯。通过脚本或动画控制方向,移动的聚光灯可以照亮场景中的一小部分区域,从而营造出戏剧性的光影效果。
方向属性
聚光灯既有位置也有方向。需要在 Lighting 中添加方向属性和数组:
1
2
3
4
5
6
7
8
9
10
static int
otherLightCountId = Shader.PropertyToID("_OtherLightCount"),
otherLightColorsId = Shader.PropertyToID("_OtherLightColors"),
otherLightPositionsId = Shader.PropertyToID("_OtherLightPositions"),
otherLightDirectionsId = Shader.PropertyToID("_OtherLightDirections");

static Vector4[]
otherLightColors = new Vector4[maxOtherLightCount],
otherLightPositions = new Vector4[maxOtherLightCount],
otherLightDirections = new Vector4[maxOtherLightCount];
创建 SetupSpotLight 方法,类似于 SetupPointLight,但额外存储光源方向:
1
2
3
4
5
6
7
void SetupSpotLight (int index, ref VisibleLight visibleLight) {
    otherLightColors[index] = visibleLight.finalColor;
    Vector4 position = visibleLight.localToWorldMatrix.GetColumn(3);
    position.w = 1f / Mathf.Max(visibleLight.range * visibleLight.range, 0.00001f);
    otherLightPositions[index] = position;
    otherLightDirections[index] = -visibleLight.localToWorldMatrix.GetColumn(2);
}
在循环中添加聚光灯的处理分支:
1
2
3
4
5
case LightType.Spot:
    if (otherLightCount < maxOtherLightCount) {
        SetupSpotLight(otherLightCount++, ref visibleLight);
    }
    break;
着色器中的聚光灯衰减
在缓冲区中添加方向数组,并在 GetOtherLight 中应用聚光灯衰减。简单做法是使用聚光灯方向和光线方向点积的饱和值:
1
2
3
4
float4 _OtherLightDirections[MAX_OTHER_LIGHT_COUNT];

float spotAttenuation = saturate(dot(_OtherLightDirections[index].xyz, light.direction));
light.attenuation = spotAttenuation * rangeAttenuation / distanceSqr;
聚光灯角度控制
聚光灯有一个角度来控制光锥的宽度。这个角度是从中心测量的,所以 90° 角相当于上面看到的效果。除此之外,还有单独的内角(inner angle)控制光照何时开始衰减。
URP 和光照贴图使用的公式是:
\[\text{attenuation} = \text{saturate}\left(\frac{d - \cos(\theta_{outer})}{\cos(\theta_{inner}) - \cos(\theta_{outer})}\right)^2\]其中 $d$ 是点积,$\cos(\theta_{inner})$ 和 $\cos(\theta_{outer})$ 分别是内外角度的余弦值。
角度参数计算
定义聚光灯角度数组:
1
2
3
4
5
6
7
8
9
10
11
12
static int
otherLightCountId = Shader.PropertyToID("_OtherLightCount"),
otherLightColorsId = Shader.PropertyToID("_OtherLightColors"),
otherLightPositionsId = Shader.PropertyToID("_OtherLightPositions"),
otherLightDirectionsId = Shader.PropertyToID("_OtherLightDirections"),
otherLightSpotAnglesId = Shader.PropertyToID("_OtherLightSpotAngles");

static Vector4[]
otherLightColors = new Vector4[maxOtherLightCount],
otherLightPositions = new Vector4[maxOtherLightCount],
otherLightDirections = new Vector4[maxOtherLightCount],
otherLightSpotAngles = new Vector4[maxOtherLightCount];
在 SetupSpotLight 中计算角度参数:
1
2
3
4
5
6
7
8
9
10
11
12
13
14
15
void SetupSpotLight (int index, ref VisibleLight visibleLight) {
    otherLightColors[index] = visibleLight.finalColor;
    Vector4 position = visibleLight.localToWorldMatrix.GetColumn(3);
    position.w = 1f / Mathf.Max(visibleLight.range * visibleLight.range, 0.00001f);
    otherLightPositions[index] = position;
    otherLightDirections[index] = -visibleLight.localToWorldMatrix.GetColumn(2);

    Light light = visibleLight.light;
    float innerCos = Mathf.Cos(Mathf.Deg2Rad * 0.5f * light.innerSpotAngle);
    float outerCos = Mathf.Cos(Mathf.Deg2Rad * 0.5f * visibleLight.spotAngle);
    float angleRangeInv = 1f / Mathf.Max(innerCos - outerCos, 0.001f);
    otherLightSpotAngles[index] = new Vector4(
        angleRangeInv, -outerCos * angleRangeInv
    );
}
注意:内角是 Unity 的新功能。
VisibleLight结构体可能没有存储它,因为这会改变其大小并需要重构 Unity 内部代码。
着色器中的角度衰减
在着色器中添加角度数组并调整衰减计算:
1
2
3
4
5
6
7
8
9
float4 _OtherLightDirections[MAX_OTHER_LIGHT_COUNT];
float4 _OtherLightSpotAngles[MAX_OTHER_LIGHT_COUNT];

float4 spotAngles = _OtherLightSpotAngles[index];
float spotAttenuation = Square(
    saturate(dot(_OtherLightDirections[index].xyz, light.direction) *
    spotAngles.x + spotAngles.y)
);
light.attenuation = spotAttenuation * rangeAttenuation / distanceSqr;
确保点光源不受角度衰减影响:
1
2
3
4
5
6
7
void SetupPointLight (int index, ref VisibleLight visibleLight) {
    otherLightColors[index] = visibleLight.finalColor;
    Vector4 position = visibleLight.localToWorldMatrix.GetColumn(3);
    position.w = 1f / Mathf.Max(visibleLight.range * visibleLight.range, 0.00001f);
    otherLightPositions[index] = position;
    otherLightSpotAngles[index] = new Vector4(0f, 1f);
}
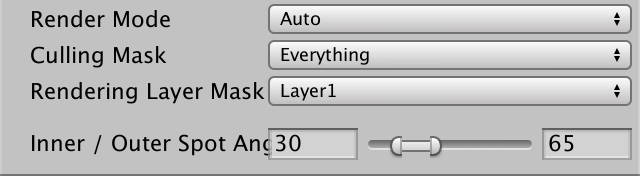
配置内角
默认情况下,Unity 的光源检视面板不显示内角选项。我们可以创建自定义编辑器脚本来暴露这个功能:
1
2
3
4
5
6
7
8
9
10
11
12
13
14
15
16
17
18
using UnityEngine;
using UnityEditor;

[CanEditMultipleObjects]
[CustomEditorForRenderPipeline(typeof(Light), typeof(CustomRenderPipelineAsset))]
public class CustomLightEditor : LightEditor {}

public override void OnInspectorGUI () {
    base.OnInspectorGUI();

    if (
        !settings.lightType.hasMultipleDifferentValues &&
        (LightType)settings.lightType.enumValueIndex == LightType.Spot
    ) {
        settings.DrawInnerAndOuterSpotAngle();
        settings.ApplyModifiedProperties();
    }
}
这个脚本扩展了 LightEditor,并使用 CustomEditorForRenderPipeline 属性来覆盖默认检视面板。对于聚光灯,它会显示内角-外角滑块。
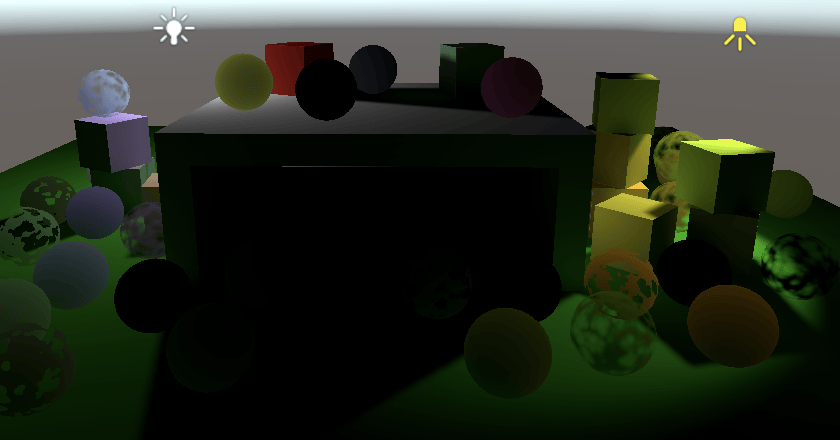
烘焙光照和阴影
本教程暂不涉及点光源和聚光灯的实时阴影,但我们将支持烘焙这些光源类型。
完全烘焙
将点光源和聚光灯的 Mode 设置为 Baked 即可进行烘焙。注意,默认情况下它们的阴影类型设置为 None,如果需要烘焙阴影,需要更改阴影类型。
光照衰减委托
烘焙点光源和聚光灯时,发现它们烘焙后太亮。这是因为 Unity 默认使用了不正确的光照衰减,与旧版渲染管线的结果相匹配。
我们可以通过提供一个委托(delegate)来告诉 Unity 使用不同的衰减方式。将 CustomRenderPipeline 改为 partial 类,并在构造函数末尾调用 InitializeForEditor 方法:
1
2
3
4
5
6
7
8
9
public partial class CustomRenderPipeline : RenderPipeline {
    public CustomRenderPipeline (
        bool useDynamicBatching, bool useGPUInstancing, bool useSRPBatcher,
        ShadowSettings shadowSettings
    ) {
        // ...
        InitializeForEditor();
    }
}
然后创建编辑器专用的 partial 类定义这个方法:
1
2
3
4
5
6
7
8
using Unity.Collections;
using UnityEngine;
using UnityEngine.Experimental.GlobalIllumination;
using LightType = UnityEngine.LightType;

public partial class CustomRenderPipeline {
    partial void InitializeForEditor ();
}
在编辑器中,我们需要重写光照贴图器设置光照数据的方式。通过提供一个委托,将数据从输入的 Light 数组传输到 NativeArray<LightDataGI> 输出:
1
2
3
4
5
6
7
8
9
10
11
12
13
14
15
16
17
18
19
20
21
22
23
24
25
26
27
28
29
30
31
32
33
34
35
36
37
38
39
40
41
#if UNITY_EDITOR
static Lightmapping.RequestLightsDelegate lightsDelegate =
(Light[] lights, NativeArray<LightDataGI> output) => {
    var lightData = new LightDataGI();
    for (int i = 0; i < lights.Length; i++) {
        Light light = lights[i];
        switch (light.type) {
            case LightType.Directional:
                var directionalLight = new DirectionalLight();
                LightmapperUtils.Extract(light, ref directionalLight);
                lightData.Init(ref directionalLight);
                break;
            case LightType.Point:
                var pointLight = new PointLight();
                LightmapperUtils.Extract(light, ref pointLight);
                lightData.Init(ref pointLight);
                break;
            case LightType.Spot:
                var spotLight = new SpotLight();
                LightmapperUtils.Extract(light, ref spotLight);
                // Unity 2022+ 可以设置聚光灯内角和衰减
                spotLight.innerConeAngle = light.innerSpotAngle * Mathf.Deg2Rad;
                spotLight.angularFalloff = AngularFalloffType.AnalyticAndInnerAngle;
                lightData.Init(ref spotLight);
                break;
            case LightType.Area:
                var rectangleLight = new RectangleLight();
                LightmapperUtils.Extract(light, ref rectangleLight);
                rectangleLight.mode = LightMode.Baked;
                lightData.Init(ref rectangleLight);
                break;
            default:
                lightData.InitNoBake(light.GetInstanceID());
                break;
        }
        // 关键:设置正确的衰减类型
        lightData.falloff = FalloffType.InverseSquared;
        output[i] = lightData;
    }
};
#endif
创建编辑器版本的 InitializeForEditor 方法来注册这个委托:
1
2
3
4
5
#if UNITY_EDITOR
partial void InitializeForEditor () {
    Lightmapping.SetDelegate(lightsDelegate);
}
#endif
当渲染管线被销毁时,需要清理并重置委托:
1
2
3
4
5
6
protected override void Dispose (bool disposing) {
    base.Dispose(disposing);
    #if UNITY_EDITOR
    Lightmapping.ResetDelegate();
    #endif
}
阴影遮罩
点光源和聚光灯的阴影也可以烘焙到阴影遮罩中,只需将它们的 Mode 设置为 Mixed。每个光源会获得一个通道,与方向光类似。但由于它们的范围是有限的,多个光源可以共用同一个通道,只要它们不重叠。因此阴影遮罩可以支持任意数量的光源,但每个像素最多只能有四个。
如果多个光源重叠并试图使用同一通道,最不重要的光源将被强制切换到 Baked 模式,直到不再冲突。

实现阴影遮罩支持
在 Shadows 中添加 ReserveOtherShadows 方法:
1
2
3
4
5
6
7
8
9
10
11
12
13
14
15
16
public Vector4 ReserveOtherShadows (Light light, int visibleLightIndex) {
    if (light.shadows != LightShadows.None && light.shadowStrength > 0f) {
        LightBakingOutput lightBaking = light.bakingOutput;
        if (
            lightBaking.lightmapBakeType == LightmapBakeType.Mixed &&
            lightBaking.mixedLightingMode == MixedLightingMode.Shadowmask
        ) {
            useShadowMask = true;
            return new Vector4(
                light.shadowStrength, 0f, 0f,
                lightBaking.occlusionMaskChannel
            );
        }
    }
    return new Vector4(0f, 0f, 0f, -1f);
}
在 Lighting 中添加阴影数据属性和数组:
1
2
3
4
5
6
7
8
9
10
11
12
13
14
static int
otherLightCountId = Shader.PropertyToID("_OtherLightCount"),
otherLightColorsId = Shader.PropertyToID("_OtherLightColors"),
otherLightPositionsId = Shader.PropertyToID("_OtherLightPositions"),
otherLightDirectionsId = Shader.PropertyToID("_OtherLightDirections"),
otherLightSpotAnglesId = Shader.PropertyToID("_OtherLightSpotAngles"),
otherLightShadowDataId = Shader.PropertyToID("_OtherLightShadowData");

static Vector4[]
otherLightColors = new Vector4[maxOtherLightCount],
otherLightPositions = new Vector4[maxOtherLightCount],
otherLightDirections = new Vector4[maxOtherLightCount],
otherLightSpotAngles = new Vector4[maxOtherLightCount],
otherLightShadowData = new Vector4[maxOtherLightCount];
在 SetupLights 中传递阴影数据到 GPU:
1
2
3
4
5
6
buffer.SetGlobalVectorArray(
    otherLightSpotAnglesId, otherLightSpotAngles
);
buffer.SetGlobalVectorArray(
    otherLightShadowDataId, otherLightShadowData
);
在 SetupPointLight 和 SetupSpotLight 中配置阴影数据:
1
2
3
4
5
6
7
8
9
10
void SetupPointLight (int index, ref VisibleLight visibleLight) {
    // ...
    Light light = visibleLight.light;
    otherLightShadowData[index] = shadows.ReserveOtherShadows(light, index);
}

void SetupSpotLight (int index, ref VisibleLight visibleLight) {
    // ...
    otherLightShadowData[index] = shadows.ReserveOtherShadows(light, index);
}
着色器中的阴影遮罩
在 Shadows 中添加 OtherShadowData 结构体和 GetOtherShadowAttenuation 函数:
1
2
3
4
5
6
7
8
9
10
11
12
13
14
15
16
17
18
19
20
21
22
struct OtherShadowData {
    float strength;
    int shadowMaskChannel;
};

float GetOtherShadowAttenuation (
    OtherShadowData other, ShadowData global, Surface surfaceWS
) {
    #if !defined(_RECEIVE_SHADOWS)
    return 1.0;
    #endif
    float shadow;
    if (other.strength > 0.0) {
        shadow = GetBakedShadow(
            global.shadowMask, other.shadowMaskChannel, other.strength
        );
    }
    else {
        shadow = 1.0;
    }
    return shadow;
}
在 Light 中添加阴影数据并将其纳入衰减计算:
1
2
3
4
5
6
7
8
9
10
11
12
13
14
15
16
17
18
19
20
CBUFFER_START(_CustomLight)
    // ...
    float4 _OtherLightShadowData[MAX_OTHER_LIGHT_COUNT];
CBUFFER_END

OtherShadowData GetOtherShadowData (int lightIndex) {
    OtherShadowData data;
    data.strength = _OtherLightShadowData[lightIndex].x;
    data.shadowMaskChannel = _OtherLightShadowData[lightIndex].w;
    return data;
}

Light GetOtherLight (int index, Surface surfaceWS, ShadowData shadowData) {
    // ...
    OtherShadowData otherShadowData = GetOtherShadowData(index);
    light.attenuation =
        GetOtherShadowAttenuation(otherShadowData, shadowData, surfaceWS) *
        spotAttenuation * rangeAttenuation / distanceSqr;
    return light;
}
每物体光源数量限制
为什么需要限制?
目前,所有可见光源都会对每个渲染的片元进行评估。这对于方向光来说是可以接受的,但对于范围外的其他光源来说是不必要的工作。通常每个点光源或聚光灯只影响一小部分片元,因此做了大量无用功,会显著影响性能。
为了支持大量光源并保持良好性能,我们必须减少每个片元评估的光源数量。最简单的方法是使用 Unity 的每物体光源索引(per-object light indices)。
工作原理
Unity 会确定每个对象受哪些光源影响,并将此信息发送到 GPU。然后在渲染每个对象时,我们只需要评估相关的光源,忽略其余的。因此,光源是按对象而非按片元确定的。这对于小物体效果很好,但对于大物体不太理想,因为如果一个光源只影响物体的一小部分,它将对整个表面进行评估。此外,每个对象能影响的光源数量有限制,所以大物体更容易缺少某些光照。
由于每物体光源索引并不完美且可能遗漏一些光照,我们将使其可选。这样也可以轻松比较两种方式的视觉效果和性能。
历史问题:Unity 的每物体光源索引代码在 Unity 2018 年后曾多次损坏,有时持续数月,导致许多 bug。这也是将其设为可选的原因之一。
每物体光源数据
在 CameraRenderer.DrawVisibleGeometry 中添加布尔参数来指示是否使用每物体光源模式:
1
2
3
4
5
6
7
8
9
10
11
12
13
14
15
16
17
18
19
20
21
void DrawVisibleGeometry (
    bool useDynamicBatching, bool useGPUInstancing, bool useLightsPerObject
) {
    PerObjectData lightsPerObjectFlags = useLightsPerObject ?
        PerObjectData.LightData | PerObjectData.LightIndices :
        PerObjectData.None;
    // ... 设置其他 perObjectData
    var drawingSettings = new DrawingSettings(
        unlitShaderTagId, sortingSettings
    ) {
        // ...
        perObjectData =
            PerObjectData.ReflectionProbes |
            PerObjectData.Lightmaps | PerObjectData.ShadowMask |
            PerObjectData.LightProbe | PerObjectData.OcclusionProbe |
            PerObjectData.LightProbeProxyVolume |
            PerObjectData.OcclusionProbeProxyVolume |
            lightsPerObjectFlags
    };
    // ...
}
将参数传递给 Render 方法:
1
2
3
4
5
6
7
8
9
10
11
public void Render (
    ScriptableRenderContext context, Camera camera,
    bool useDynamicBatching, bool useGPUInstancing, bool useLightsPerObject,
    ShadowSettings shadowSettings
) {
    // ...
    DrawVisibleGeometry(
        useDynamicBatching, useGPUInstancing, useLightsPerObject
    );
    // ...
}
在 CustomRenderPipeline 中跟踪这个模式:
1
2
3
4
5
6
7
8
9
10
11
12
13
14
15
16
17
18
19
20
21
22
bool useDynamicBatching, useGPUInstancing, useLightsPerObject;
ShadowSettings shadowSettings;

public CustomRenderPipeline (
    bool useDynamicBatching, bool useGPUInstancing, bool useSRPBatcher,
    bool useLightsPerObject, ShadowSettings shadowSettings
) {
    this.shadowSettings = shadowSettings;
    this.useDynamicBatching = useDynamicBatching;
    this.useGPUInstancing = useGPUInstancing;
    this.useLightsPerObject = useLightsPerObject;
    // ...
}

// 在 Render 方法中传递
for (int i = 0; i < cameras.Count; i++) {
    renderer.Render(
        context, cameras[i],
        useDynamicBatching, useGPUInstancing, useLightsPerObject,
        shadowSettings
    );
}
在 CustomRenderPipelineAsset 中添加开关选项:
1
2
3
4
5
6
7
8
9
10
11
12
13
[SerializeField]
bool
useDynamicBatching = true,
useGPUInstancing = true,
useSRPBatcher = true,
useLightsPerObject = true;

protected override RenderPipeline CreatePipeline () {
    return new CustomRenderPipeline(
        useDynamicBatching, useGPUInstancing, useSRPBatcher,
        useLightsPerObject, shadows
    );
}
清理光源索引
Unity 会为每个对象创建一个所有活动光源的列表,按重要性排序。这个列表包含所有光源,无论它们是否可见,也包括方向光。我们需要清理这个列表,只保留可见的非方向光索引。
在 Lighting.SetupLights 中处理:
1
2
3
4
5
6
7
8
9
10
11
12
13
14
15
16
17
18
19
20
21
22
23
24
25
26
27
28
29
30
31
32
33
34
35
36
37
38
39
40
41
42
43
44
45
46
47
public void Setup (
    ScriptableRenderContext context, CullingResults cullingResults,
    ShadowSettings shadowSettings, bool useLightsPerObject
) {
    // ...
    SetupLights(useLightsPerObject);
}

void SetupLights (bool useLightsPerObject) {
    NativeArray<int> indexMap = useLightsPerObject ?
        cullingResults.GetLightIndexMap(Allocator.Temp) : default;

    NativeArray<VisibleLight> visibleLights = cullingResults.visibleLights;
    // ...

    for (int i = 0; i < visibleLights.Length; i++) {
        int newIndex = -1;
        VisibleLight visibleLight = visibleLights[i];
        switch (visibleLight.lightType) {
            // ... 处理方向光
            case LightType.Point:
                if (otherLightCount < maxOtherLightCount) {
                    newIndex = otherLightCount;
                    SetupPointLight(otherLightCount++, ref visibleLight);
                }
                break;
            case LightType.Spot:
                if (otherLightCount < maxOtherLightCount) {
                    newIndex = otherLightCount;
                    SetupSpotLight(otherLightCount++, ref visibleLight);
                }
                break;
        }
        if (useLightsPerObject) {
            indexMap[i] = newIndex;
        }
    }

    // 消除不可见光源的索引
    if (useLightsPerObject) {
        for (int i = visibleLights.Length; i < indexMap.Length; i++) {
            indexMap[i] = -1;
        }
        cullingResults.SetLightIndexMap(indexMap);
        indexMap.Dispose();
    }
}
根据是否使用每物体光源来启用或禁用着色器关键字:
1
2
3
4
5
6
7
8
9
10
11
12
static string lightsPerObjectKeyword = "_LIGHTS_PER_OBJECT";

void SetupLights (bool useLightsPerObject) {
    // ...
    if (useLightsPerObject) {
        // ...
        Shader.EnableKeyword(lightsPerObjectKeyword);
    }
    else {
        Shader.DisableKeyword(lightsPerObjectKeyword);
    }
}
使用光源索引
在 Lit 着色器的 CustomLit Pass 中添加多编译指令:
1
#pragma multi_compile _ _LIGHTS_PER_OBJECT
所需数据是 UnityPerDraw 缓冲区的一部分,由两个 real4 值组成,定义在 unity_WorldTransformParams 之后:
1
2
3
real4 unity_WorldTransformParams;
real4 unity_LightData;
real4 unity_LightIndices[2];
在 GetLighting 中使用替代循环来处理其他光源:
1
2
3
4
5
6
7
8
9
10
11
12
#if defined(_LIGHTS_PER_OBJECT)
for (int j = 0; j < min(unity_LightData.y, 8); j++) {
    int lightIndex = unity_LightIndices[(uint)j / 4][(uint)j % 4];
    Light light = GetOtherLight(lightIndex, surfaceWS, shadowData);
    color += GetLighting(surfaceWS, brdf, light);
}
#else
for (int j = 0; j < GetOtherLightCount(); j++) {
    Light light = GetOtherLight(j, surfaceWS, shadowData);
    color += GetLighting(surfaceWS, brdf, light);
}
#endif


性能注意事项
需要注意的是,启用每物体光源后 GPU 实例化效率会降低,因为只有光源数量和索引列表匹配的对象才能被分组。SRP Batcher 不受影响,因为每个对象仍然获得自己的优化绘制调用。
总结
在本教程中,我成功实现了:
- 点光源支持 - 添加了位置属性和距离衰减计算
- 聚光灯支持 - 添加了方向控制和角度衰减,包括内角和外角
- 光源范围 - 实现了基于范围的光照衰减
- 烘焙光照 - 为点光源和聚光灯添加了烘焙支持,包括正确的衰减类型
- 阴影遮罩 - 支持混合模式光源的阴影遮罩
- 每物体光源限制 - 实现了每物体最多8个光源的限制,大幅优化性能
- 自定义编辑器 - 暴露了聚光灯的内角配置选项
下一篇翻译文章点光源和聚光灯阴影